How to Install Docmost on Synology NAS (DS916+) with Docker
-
 Jason Yang
 - 01 Jan, 2026
- Updated 04 Jan, 2026
- Views —

This guide explains how to install and run Docmost, an open‑source collaborative wiki and Notion alternative, on a Synology NAS (DS916+ and similar models) using Docker.
The guide focuses on real‑world Synology setups, including Reverse Proxy + WebSocket configuration, which is essential to avoid the common “Real‑time editor connection lost” error.
1. Reverse Proxy Setup (Required for External Access)
To access Docmost via an external domain (for example, docmost.your-domain.i234.me) and to ensure real‑time collaboration works correctly, you must configure Synology’s Reverse Proxy with WebSocket support.
Step 1. Open Reverse Proxy Settings
- Go to DSM Control Panel
- Navigate to Login Portal → Advanced
- Click Reverse Proxy, then click Create
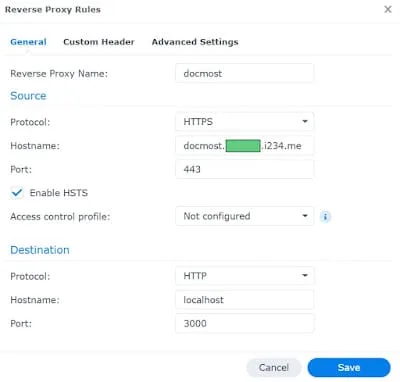
Step 2. General Settings
Configure the basic reverse proxy rule:
- Source
- Protocol:
HTTPS - Hostname:
docmost.your-domain.i234.me - Port:
443
- Protocol:
- Destination
- Protocol:
HTTP - Hostname:
localhostor NAS internal IP (e.g.192.168.0.4) - Port:
3000
- Protocol:
This forwards external HTTPS traffic to the Docmost container.
Step 3. (Crucial) Enable WebSocket Headers
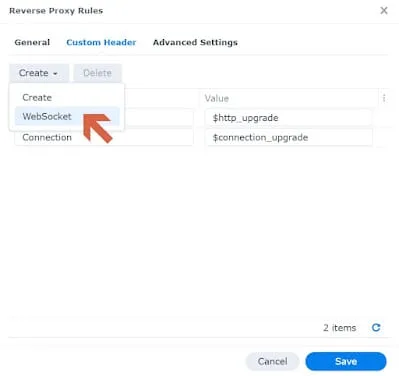
This step is mandatory to prevent the real‑time editor connection lost issue.
- After creating the rule, open it again
- Go to the Custom Header tab
- Click Create → WebSocket
- Synology will automatically add the required headers
- Click Save
✅ Without this step, collaborative editing will not work reliably.
2. Installation Process
Step 1. Enable SSH
- Open Control Panel → Terminal & SNMP
- Enable SSH service
Step 2. Create Installation Directory
- Open File Station
- Navigate to the
dockershared folder - Create a new folder named
docmost
Final path:
/volume1/docker/docmost/Step 3. Create docker-compose.yml
Inside the docmost folder, create a file named docker-compose.yml.
Before using the file, update the following values:
- APP_URL: Your external Docmost domain
- YOUR_DATABASE_PASSWORD: Database password (avoid special characters like
@or$) - SMTP settings (optional): Use correct mail server credentials
APP_SECRET: A random string of at least 32 characters
openssl rand -hex 32Final docker-compose.yml
version: '3.8'

services:
  docmost:
    image: docmost/docmost:latest
    container_name: docmost
    restart: unless-stopped
    ports:
      - "3000:3000"
    depends_on:
      - db
      - redis
    environment:
      APP_URL: "https://docmost.your-domain.i234.me"
      APP_SECRET: "ENTER_A_VERY_LONG_RANDOM_SECRET_KEY_HERE"
      DATABASE_URL: "postgresql://docmost:YOUR_DATABASE_PASSWORD@db:5432/docmost?schema=public"
      REDIS_URL: "redis://redis:6379"

      # Optional SMTP configuration (example: Naver Mail)
      EMAIL_FROM: '"Docmost Notification" <your_id@naver.com>'
      SMTP_HOST: "smtp.naver.com"
      SMTP_PORT: "465"
      SMTP_SECURE: "true"
      SMTP_USER: "your_id@naver.com"
      SMTP_PASSWORD: "ENTER_YOUR_NAVER_APP_PASSWORD_HERE"

    volumes:
      - docmost_data:/app/data/storage

  db:
    image: postgres:16-alpine
    container_name: docmost-db
    restart: unless-stopped
    environment:
      POSTGRES_DB: docmost
      POSTGRES_USER: docmost
      POSTGRES_PASSWORD: "SAME_PASSWORD_AS_DATABASE_URL_ABOVE"
    volumes:
      - db_data:/var/lib/postgresql/data

  redis:
    image: redis:7.2-alpine
    container_name: docmost-redis
    restart: unless-stopped
    volumes:
      - redis_data:/data

volumes:
  docmost_data:
  db_data:
  redis_data:
Step 4. Run Docmost via SSH
Connect to your NAS and start the containers:
ssh <DSM_ADMIN_ACCOUNT>@<NAS_INTERNAL_IP>
sudo -i
cd /volume1/docker/docmost/
docker-compose up -d
Docker will download the images and start all services in the background.
3. Useful Docker Commands
Check container status:
docker-compose psView logs (useful for troubleshooting):
docker-compose logs -fStop and remove containers:
docker-compose down4. After Installation
- Access Docmost at:
https://docmost.your-domain.i234.me - Create the first admin account
- Verify real‑time editing works (cursor updates, live typing)
For production use, it is recommended to back up Docker volumes regularly using Synology Hyper Backup.
Conclusion
Running Docmost on a Synology NAS with Docker is stable and efficient when Reverse Proxy and WebSocket headers are configured correctly.
This setup provides:
- Secure HTTPS access
- Real‑time collaboration
- Persistent data storage
A solid self‑hosted alternative to Notion for teams and personal knowledge bases.